


Tsoureki, the Sweet Bread That Defines Every Greek CelebrationTsoureki is more than a recipe, it is a cultural symbol woven into every Greek celebration. This soft, aromatic braided bread carries the scent of mahlepi and mastiha, the warmth of family gatherings, and the nostalgia that every Greek instantly recognizes.
In Greece we prepare tsoureki for two major holidays, Easter and Christmas. Each season brings its own traditions, but the heart of the recipe remains the same, a sweet, fluffy dough with a shiny crust and that unmistakable aroma that fills the kitchen as it bakes.
At Christmas, tsoureki appears on festive tables alongside melomakarona and kourabiedes, bringing a sense of abundance and celebration.
At Easter, the symbolism becomes even stronger. Families braid the dough and decorate it with red eggs, giving the tsoureki its characteristic festive look. The red egg represents renewal and joy, and placing it in the center of the braid is a tradition that has passed from one generation to the next.
The recipe I share on my website is my grandmother’s. It has been tested for many years and never fails. Her tsoureki always came out light, beautifully soft, and deeply aromatic, the kind of sweet bread that filled the entire home with warmth the moment it came out of the oven.
Every family has its own secrets, and this recipe carries hers, simple but powerful techniques that transform the dough into a perfect, fluffy braid.
Crockery & ingredients I love using—find them all here: My Mediterranean Greek Pantry
1 ½ Kg/ 3 lbs strong bread flour, sifted
90 g/ 3,1oz fresh yeast
150 g / 5.2 oz butter, melted
500 g/ 17,6oz sugar
4 eggs + 2 eggs for brushing Tsourekia
350 ml warm whole milk
1 tsp. crushed Chios mastic
1 1/2 tsp. grated mahlepi ( aromatic spice)
1 1/2 tsp grated kakoule ( ground cardamom seeds)
1 tbsp orange zest
pinch of salt
1 tsp vanilla extract
½ cup sliced almonds or sesame seeds
Directions
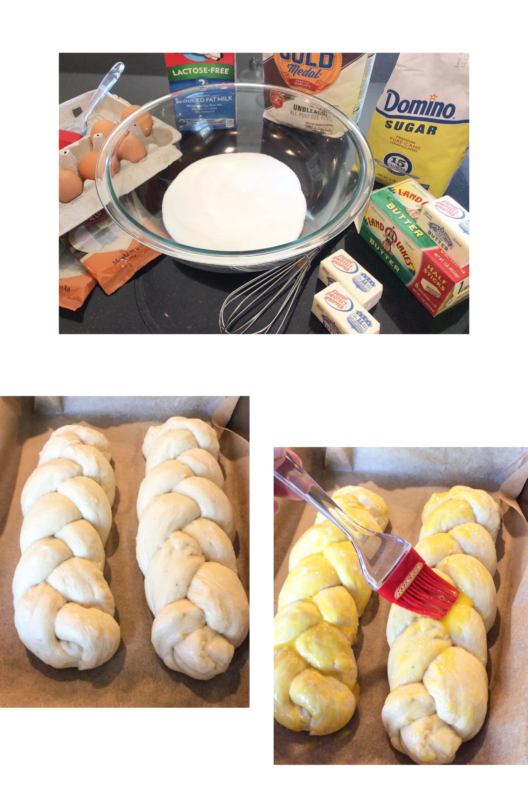
In a bowl, combine the yeast with a glass of warm water and 250 g (8.8 oz) of sifted flour. Mix well, cover the bowl, and let it sit in a warm spot for about 1 hour until bubbly and active.
In the bowl of a stand mixer, beat together the sugar, eggs, and vanilla extract. Slowly add the warm milk and continue mixing until fully combined.
Add the activated yeast mixture to the bowl along with the sifted flour, kakoule (cardamom), mahlab, orange zest, and mastiha (if using).
Using the dough hook, begin mixing on low speed until the ingredients start to come together. Then increase to medium-high speed and knead until the dough is smooth. Gradually add the butter while mixing on low. The dough is ready when it’s soft and pulls away from the sides of the bowl.
Cover the bowl with clean kitchen towels and leave it in a warm place for 2 to 3 hours, or until the dough has doubled in size.
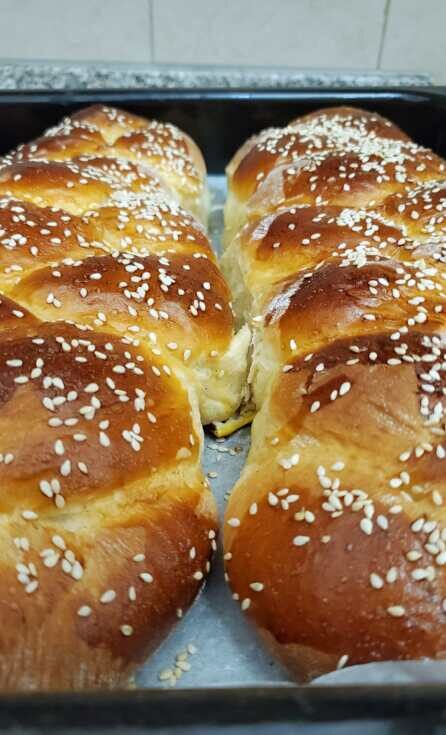
Punch down the dough, divide it into equal portions, and roll each into ropes. Braid three ropes together to form each tsoureki loaf. Place each braid onto a baking tray lined with parchment paper.
Beat the egg yolks with a bit of water and brush the tops of the loaves. Optionally, sprinkle with almond slices or sesame seeds for extra flavor and texture.
Bake in a preheated oven at 160°C (320°F) for 20 to 30 minutes, or until the tsourekia are beautifully risen and golden brown on top.
TIPS
Here are some key secrets to make your Tsourekia extra fluffy, light, and aromatic—just like the ones from the best Greek bakeries:
- Strong Flour = Strong Structure
Use bread flour or a high-protein flour (at least 12%) instead of all-purpose. This creates a stronger gluten network, which helps the dough rise higher and hold its shape.
- Knead it… then knead it more
Kneading well is key. You want to develop the gluten so the dough becomes elastic and smooth. Knead for 15–20 minutes with a mixer or about 25 minutes by hand until the dough passes the windowpane test (you can stretch it without it tearing).
- Don’t rush the rise
Tsoureki needs long fermentation to develop both flavor and fluffiness.
Let the dough rise slowly in a warm spot until doubled—this can take 2–3 hours.
For even better flavor and texture, let it rise overnight in the fridge for the first proof. Bring to room temp before shaping.
- Don’t add all the flour at once
Start with less flour and gradually add more while kneading. The dough should be soft, slightly sticky, but manageable. Adding too much flour makes the tsoureki dry and dense.
- Use fresh yeast or properly activated dry yeast
If using instant yeast, mix it directly with the flour. If using active dry yeast, activate it in warm milk with a bit of sugar first (but not too hot—around 38–40°C/100–105°F).
- Eggs and butter at room temperature
Always use room temp ingredients so they incorporate evenly. And use good quality butter—it gives the rich flavor and soft texture tsoureki is known for.
- Aromatics make it magic
Traditional mahlepi and mastiha add depth and that signature Greek tsoureki flavor. Orange zest or a splash of vanilla can also enhance the aroma.
- Let it rise again after shaping
After braiding or shaping the dough, let it rise again until puffy, about 45–60 minutes. This second rise makes it lighter and prevents cracking during baking.
- Bake just until golden
Overbaking will dry it out. Bake at 170–180°C (340–350°F) for around 25–35 minutes, depending on size.
- Brush with egg wash
Right before baking, brush with egg wash (egg + milk or water) for that shiny, golden crust.


Leave a Reply